
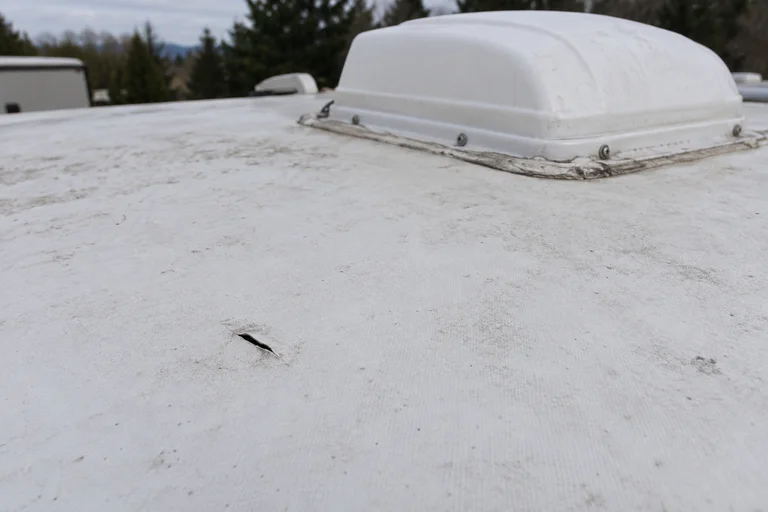
You find a small slit in the roof membrane, but the ceiling inside is dry. Does it need a patch, or is the roof already damaged underneath? The visible opening tells you the weather barrier needs attention. It doesn't tell you the condition of the whole roof.
The next decision depends on where the opening is, which roof material is installed, what has already been applied to it, and whether water has affected the structure below. A small hole is not an automatic reason for a complete roof replacement. It is also not proof that a quick cover-up will finish the job.
Start with safe observations, not a roof walk
Don't climb onto an unfamiliar, wet, or potentially damaged roof to test it with your weight. Roof access and load limits vary by RV. A ladder on the back doesn't establish that every part of the roof is safe to stand on. Leave close inspection to someone with suitable access and knowledge of the construction.
From inside, look for new ceiling discoloration, damp trim, changed wall covering, or water around a roof opening. Photograph what you can see without removing fixtures or electrical covers. Record when the hole was noticed and whether the RV has been exposed to rain since then.
No visible drip is encouraging, but it isn't a moisture test. Likewise, a stain doesn't prove the hole directly above it is the only entry point. Give the technician the observations without turning them into a conclusion.
A puncture away from fittings is a different repair
Dicor's Patchit instructions describe a repair for a hole within a structurally sound, functional roof. They exclude damage running into a vent, air conditioner, skylight, or other penetration. That distinction matters more than whether the damage looks small in a phone photo.
A hole in an open area of membrane presents one set of bonding surfaces. A split at a vent flange or roof edge involves a joint and its sealing arrangement. Covering both with the same square of tape can conceal the joint without addressing why it opened.
Send one close photo if it is already available and one wider view that shows the nearest fitting or edge. Don't take a risky climb just to obtain them. A tightly cropped picture of the slit leaves out the information needed to plan access and repair.
Identify the membrane and anything on top of it
White roofing isn't a material specification. Use the RV records, roof replacement paperwork, or manufacturer information to identify the installed system. An older RV may no longer have its original roof.
Alpha Systems publishes separate care and repair guidance for its roofing products, including different repair situations. That is a reason to match the procedure to the actual membrane, rather than choose a product because its packaging says RV.
Previous coatings and patches also affect the decision. Dicor's cited kit, for example, is not intended to go over a previous repair or coating, and its instructions direct owners with a manufacturer's roofing warranty to consult that manufacturer. These are restrictions for that product, not a blanket statement that every repaired roof must be replaced.
Don't scrape off an old patch, experiment with solvents, or apply several products while waiting for service. Identify what is there first. Keep the product names and receipts for any material already used so the technician doesn't have to guess about compatibility.
The surface repair and the underlying damage are separate questions
A patch can restore a weather barrier. It cannot restore the strength of damaged decking beneath that barrier. Alpha's roof seam repair guidance explicitly calls for evaluating the decking and replacing it when soft. The extent of that work requires inspection; it cannot be estimated reliably from the diameter of the visible hole.
Ask for the findings that support the repair recommendation: Is the surrounding material suitable for bonding? Is the supporting roof structure sound? Is this one isolated opening or part of wider deterioration? What evidence indicates moisture, and what area needs further evaluation?
Those answers separate a localized membrane repair from work involving the roof assembly. If replacement is recommended, ask which findings make a smaller repair unsuitable. If a patch is recommended, ask how the condition underneath was assessed.
Coating the roof is not the first diagnostic step
A coating recommendation should come after identifying the fault. Alpha notes that its seal and top-coat treatment is not a patch and directs leaking roofs to a service center for evaluation. A new uniform surface can look reassuring while leaving the original repair question unanswered.
A blister is also different from an open puncture. Dicor's EPDM guidance describes some membrane bubbles associated with installation or changing conditions and warns against puncturing them. That guidance should not be used to dismiss new lifting, wetness, or damage on an unidentified roof. Record the change and have it assessed.
What to do while arranging an inspection
Act promptly to limit further weather exposure. If the RV can be moved safely and a suitable covered location is available, that can reduce exposure while service is arranged. Don't drive with loose roof material or an unsecured cover. Ask for a model-appropriate temporary protection plan instead of climbing up with household tape before a storm.
Move belongings away from an interior drip if you can do so safely. Keep clear of wet electrical fittings and do not open them. Avoid deliberately spraying the roof to reproduce a leak; controlled testing belongs with someone who can manage water entry and inspect the affected area.
If water appears only while the air conditioner runs, our guide to indoor AC drips explains why that timing deserves a different investigation. It doesn't rule out a separate roof defect.
Request an inspection with your location, RV model, roof history, and the photos you already have. Describe whether water is entering now and whether the material appears loose. We'll review the scope and access needed before confirming the service approach.